Don't forget natural light - How to shoot high-key
I started to use off-camera flash in my photography works back in 2007. At the time I used to photograph everything with available natural light, playing around with reflectors and finding angles that would match the ambient light. But then I started to learn using a flashgun in a proper way and became addicted to the fact that having a flashgun in your bag makes it your own available light that you can carry with you where ever you go and use it whenever you need it. But as exciting as it is when you start to get nice balanced shots, you tend to go all the way with flash only and forget the natural light. Don't forget that lighting with flash is not The way but just A way to light your image. So recently I forced myself to include natural light shots in my sessions.
Last week, I went to Paris for the second part to my training on eZ Publish. So I took the opportunity and contacted the Strobist@Paris group and helped organizing a photoshoot and launched a casting call on ModelMayhem. On the 4 models booked, 3 have cancelled so we ended up with Gabriel. It turned out that it was perfect as we were only four photographers. So while two were shooting, the two others assisted with the lighting gears. We decided to meet at "La Defense", as some one suggested the place. It was amazing! So many different place to shoot with different kind of backgrounds with great modern buildings. I was really pleased.
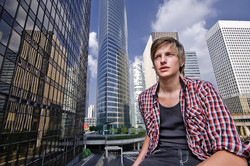
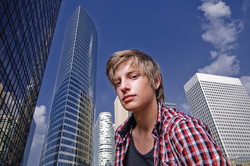
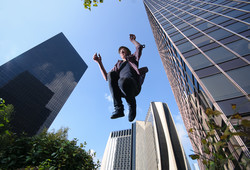
Ben, another photographer who has organized the event and liaised with the models from the casting call, took us to some place he knew and we started to setup our lights and place the model. Seeing the view I just said to myself "that is another shot for my Sigma 10-20mm!" and here we go, 1 white shoot through umbrella, a reflector to fill the shadow. As the sun was very bright it was a bit difficult to get an exposure so I had the huge umbrella do double duty: it will at the same time hide the model from the sun and light him at the same time. My ISO was at lowest with a shutter speed set to my Maximum Flash Sync Speed of 1/250 sec. I then took some test shots until I was happy with the background: f/7.1. Then I turned on the flash on the umbrella and start some new test shots and adjusted the flash power until I was happy with the exposure for Gabriel. Once the settings are found, I just went shooting and shooting, variating angles and focal length. Here are the results:
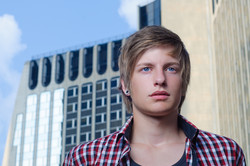
On the way to that first location, I've spotted a building I would have liked in the background, so we went back there just to shoot quickly. I then used my 50mm f/1.8 and shot at the same settings as above. As we made sure the flash was at same distance, there is no need to change any settings. That's the beauty of shooting in Manual mode! And just for the fun we did a jumping shot, two flash guns at each side in front of Gabriel to help freeze him in the air.
Now you are going to ask me where are the natural light shots?! But didn't I told you that when you start with off-camera flash you become addicted?...
So we all went to our final location which was an underground footpath. What is interesting with underground footpath and tunnels are:
- they are dark so it's easy to control your light. Well, easy is depending on your lighting skills of course, but with perseverance and passion you will improve.
- you have walls and ceiling you can use as reflector or bounce surface.
- the entrance is bringing in a very nice natural and soft light
When I saw how the light was hitting the wall I just thought "high-key"! And yes you can get high-key images without flash. The technique is very simple:
- set your camera to aperture priority. I like it between f/2.8 and f/4, but that my personal taste.
- set your metering to spot metering.
- start with setting your camera exposure compensation to +1 EV.
- have your model stands in front of the lit wall so that he turns his back to the wall and faces the dark side of the tunnel
- take test shots and adjust your camera exposure compensation
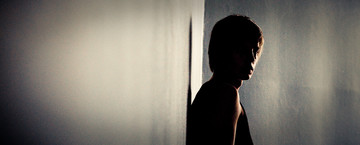
Explanation: having the subject in front of a lit wall facing the dark side of the area will get you a silhouette shot. As most of the area recorded by the camera sensor is part of the lit wall, the camera will automatically expose for the wall. This usually means bringing the global exposure down and thus the wall is properly exposed but your subject is completely (or nearly) black out as the following image:
This can be a style on its own. I'm quite happy with this shot, but did prefer to crop it down to a panoramic ratio. I think that makes the image stronger.
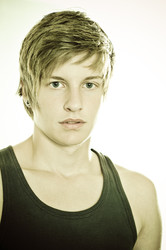
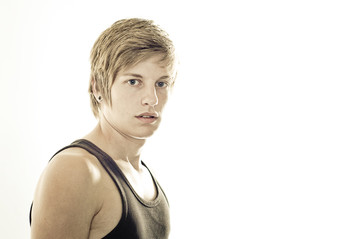
So in order to deal with this silhouette situation, what you need to do is tell the camera which part of the picture you want to be properly exposed. And to do this you switch your metering to spot metering, the camera will then use your focus point as the spot to mesure the exposure. In my case it was Gabriel's face, or precisely his eye. The exposure compensation set to +1 EV is to achieve the high-key feel as you want everything bright. As a result, the camera is now calculating the correct exposure for the model's face and adds +1 EV to the calculation, thus the model face will be 1 stop over exposed, no big deal you can play with the contrast to bring back the important details, but what is great is by doing so it is also over-exposing the background that was already brighter than the subject! So what you get is a completely white background, see this shot:
Cool isn't it? This shot contains some noise, but that's fine for this shot. The reason is I've boosted the ISO to 1600 in order to have a decent shutter speed and reduce movement blur (the camera was hand held, leaning against the wasll). At 100% zoom you will see all the noise, but web sizes and print the noise becomes a nice grain that works on this shot. Settings for this shot are: 50mm, 1/20sec @ f/2.8
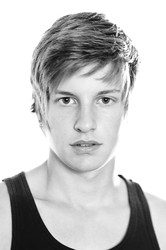
I wanted some close up headshots so did some test at different ISO settings. The first shot was at ISO 200, 1.3 sec @ f/3.2, there are obvious movement blur but I still like the result. The second shot was at ISO 400, 1/3 sec @ f/2.8, it's better but a monopod or a tripod would be very helpful.
That's it! It's fairly easy to get this. The difficulty is to get stabilized. Use a monopod or a tripod for this technique. If you cannot find a tunnel, you can just find a shade with a wall lit by the the ambient outside of the shade. What you need is the subject in the shade and a brighter background.
See more of this photoshoot on my Flickr account.
Tweet


Comments