Flash and slow shutter speed - Part II: Painting with light
Mid June 2007, one of my best friends was getting married in France. For his wedding day, I decided that I should give a try with flash photography for low light conditions. So I bought a Sigma EF-500 DG ST, an E-TTL only flash. Having no clue on how to properly use a Flash gun using E-TTL, I started to look for a good tutorial on the web. One of them was linking to a blog called Strobist. That was the start of an addiction. I couldn't stop reading that great blog that teaches you all you need to know about off-camera flash photography. My issue then was that my Sigma flashgun was E-TTL only and the blog is mentionning about using manual flash to have full control on your work. So after the wedding I sent the flashgun back to the shop for an exchange for the Sigma EF-500 DG Super which allows manual control of the flash.
November 2007, the EHHPS (a local photographic society here in Ealing) was organizing what they call "Panel of Prints Competition". As its name indicates it's a competition where you present a panel that has to be composed of at least 3 and up to 6 images that have to be linked by a same subject or that are telling a story. So one night, coming back from work on the bus, I was trying to think of what to shoot for this competition. It was the time where "painting with light" photographs was flourihing on the web. The idea was in my head for quite a while already, but I didn't want to do something that has already been done so many times and wanted to add something more to it: "what about mixing two techniques to it? A off-camera lit self-portrait and painting with light?". That sounds cool to me and few ideas started to grow as I nearly missed the bus stop....
Painting with light consist of taking a photograph with a very long shutter speed (usually measured in seconds or even minutes) and using a flashgun or flashlight (torch) to draw in the air or paint an object with it. Painting with light allows the creation of virtual objects overlayed on top of an existing real scene. It also allows you to light an object, that is too large for a single small flashgun to lit all of it, by lighing it multiple times.
For more details on the classic "Painting with light" technique please refer to Google: "painting with light on Google".
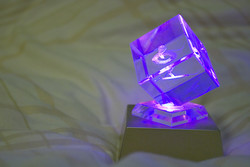
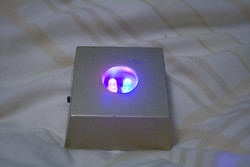
For my little project the painting with light technique I wanted to use was the drawing one, I didn't want to light large object or my face with a flashlight but rather draw something that was going to complement a self-portrait. Most of painted with light photographs I viewed have something I didn't like much, it was the fact that the light from a torch taken at a certain distance created lines of light that are too thin and to draw a large object you need to draw a lot of lines which make the drawing a bit messy to my taste. So during my quest for the ideal torch, I've found this crystal cube socket pedestal that is composed of two red and blue LEDs. The light was alternating from red to blue which I thought could give great results. I've added some toilet paper wrapped around the two LEDs to diffuse the light and make it into a larger area.
So I got all I needed for a proper painting with light shoot: DSLR camera (Canon 350D at the time), a tripod, a camera remote wireless trigger, a white shoot thru umbrella, a manual flashgun and an E-TTL cord.
For the painting with light to work properly, I needed a dark place to shoot in. So I closed all curtains and doors in my room and as it was at night, the room was completely dark. I've then set my umbrella and flash on a lightstand on one side and the camera next to it. The flash should light me at about 45 degrees from camera's left. One of the difficulties was to focus properly as this is a self-portrait. Using my camera remote trigger and with the room's light on, I positionned myself where I was going to stand during the shoot and did a test shot. Then I switched my camera to manual focus so that it will lock the focus. Setting the camera to f/9 did also help with the depth of field.
Most of painting with light photographs are done in natural light without the use of a flashgun and thus you would just see the light drawing something in the air and would barely see the person holding the torch and also most of the time you would see the background scene appearing because of the long shutter speed. What I wanted is a well lit portrait with a uniform background. These requirements were going to be given to me by the use of a flash. Remember that by using the flash you can control the flash exposure by setting the aperture only and the background would be controled by the shutter speed once the aperture set.
So the next thing to do is to expose the flash for my face. My aperture was already assigned, I wanted f/9. So to expose the flash, my only option is to change the flash output power. After trial and errors and chimping, I've decided that I liked my Sigma flash to give me a burst of light at 1/8th of its power. Having the flash shooting thru a translucent white umbrella made the light softer with a nicer catch light in the eyes.
Now that the aperture and flash power were decided, I then set the shutter speed to 15 seconds. As the room was very dark, even at 15 seconds @f/9 the image was pitch black. 15 seconds was the estimated time that I would need to pose for the self-portrait and then take the torch, switch it on, draw what I wanted to draw and switch the torch off.
Why would this work? The flashgun delivers a very short burst of light (faster than 1/1000 sec). After the burst of light the camera's sensor will capture nothing else but the darkness of my room. I could have jumped, danced or do what ever I wanted and wouldn't appear on the photograph as long as no light was switched on. Holding the torch so the LEDs are pointing to the camera makes it record only the light coming out of them. My hand that is holding the torch won't even get caught by the sensor as it is moving too fast while receiving too few of the LEDs' light.
The Thinker
The process of taking the pictures for this project is as followed:
- Pose at a fixed position from the camera and umbrella to keep the same focus and exposure.
- Press the shutter button on the wireless remote trigger. It was set to give me 2 seconds after pressing the button.
- Put the trigger back on the bed next to me.
- The camera starts the 15 seconds exposure and the flash goes off at first curtain (nearly as soon as the camera was triggered).
- Right after the flash went off, pick-up the LED pedestal, hold it at its initial position (guessed), switch it on and start to draw.
- Draw something during the 15 seconds of exposure.
- Hopefully, you will finish to draw before the end of the 15 seconds.
- Chimp the camera to verify the exposure and composition.
- Go back to #1 if any issue...
- Going crazy if failures or jump to the ceiling if success
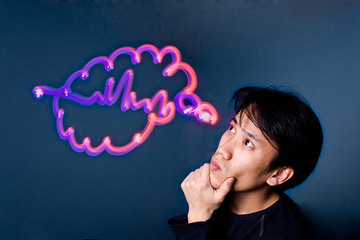
The difficulty here is to give the cloud of light a nice shape and to keep a good composition and pose at each re-take of the shot. Sometimes the cloud is perfect but not the pose, sometimes it is reversed or both are craps... You need to be patient and persevere!
Thinking and planning the photograph will help you a lot. This is the idea of "The Thinker", elaborate your idea first, have it drawn on paper if needed.
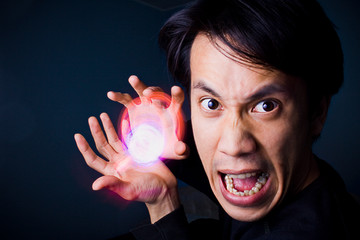
Kamehameha (the Dragon Ball effect)
Like a lot of us, I've been a big fan of Dragon Ball when I was kid. It's a manga based on a Chinese legend: "Journey to the West" or "The Monkey King". Sangoku, the hero of the series became a martial art expert and could generate a ball of energy by concentrating on his Kamehameha technique. Here I wanted to illustrate the concept of concretizing an idea. In photography this would be organizing a photoshoot based on your plan: setting up the lights, posing the model, setting the camera, composing the scene etc... until the last moment... when it clicks.
To get the ball of energy between my hands what I've done is pose for the camera and when the flash went off, I needed to keep my lower hand in position trying to move it as less as possible. Then with the other hand, grab the torch and positioned it above my hand that was staying in position. That hand in position was my point of reference, it helped me position the torch. I kept that hand in position for a couple of seconds as I continued to draw the ball of energy then removed it to avoid it from receiving too much of the torch light.
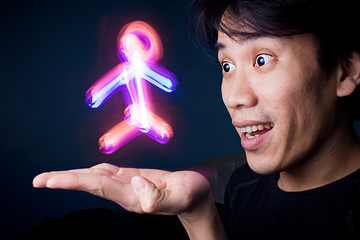
My Friend of Light
My favorite out of my panel of three prints is the next picture. For me it is illustrating the concept of "Enjoying the result" after spending so much time on planning and executing the work. Taking this shot was quite tricky: additionaly to being difficult to take a self-portrait it was also difficult to pose and compose well and drawing a decent stickman at the same time. I did take a lot of shots before getting this one where the stickman looked good and I looked not too bad... Some of the discarded shots were having a distorted stickman, I was looking my palm instead of the stickman's face in others, the stickman was perfect and I was looking straight at him but then my facial expression was really awkward...
But hey, with patience you can get what you want:
Next time I will just need a better background or clone out that bed frame... :-D
Tweet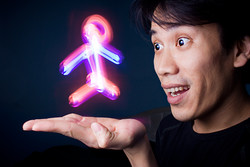
Comments
just to understand
Saturday 16 May 2009 10:05:03 am
Commented by Ivan
l'oeil et la maniere
Another new technique to explore.
Wednesday 27 May 2009 5:28:53 am
Commented by soliduss
Answering your question
Thursday 28 May 2009 12:29:38 pm
Commented by Quoc Huy
Monday 10 May 2010 12:22:18 pm
Commented by Rupak Dutta
Sharing pics
Monday 10 May 2010 12:38:22 pm
Commented by Quoc-Huy
Wednesday 28 July 2010 9:02:35 am
Commented by
Awesome!
Tuesday 02 August 2011 8:15:43 pm
Commented by Winobean